Installing the Novi Builder: A Quick Guide
The procedures of installing the Novi Builder and importing the templates are quite easy.
In this article, we are going to describe the Novi Builder installation and template import process, mainly with images and simple directions. Please spend a few minutes to ensure that you are doing everything properly.
Feel free to add a comment if some steps should be described in more detail.
We are going to talk about the following:
- Builder installation;
- HTML template import;
- Possible installation issues and solutions.
Getting a Server
Novi Builder requires a server environment. Firstly, you should get a server. It can be live or localhost. Therefore, to ensure the correct work with Novi Builder, your hosting server should meet the following requirements. You may check additional information for Novi blog visitors users regarding the hosting service.
If you are not ready to go live and cannot wait to see the builder in action, just install WAMP or XAMPP for Windows or MAMP for IOS.
However, the main idea of having a Novi Builder visual editor on server is changing the content from any browser or computer. All you need is a password and the access to the Internet.
Installing Novi Builder: Required Steps
We are going to describe the Novi Builder installation process on the live host. Screenshots below were captured from the Bluehost hosting control panel (cPanel)).
By the way, Bluehost is 100% compatible with builder and templates, and comes with 49% OFF! Price is starting at $2.95/mo. Please use this link to learn more.
Step 1: Get the Novi Builder
First of all, download the latest editor release directly from your account at Novibuilder.com
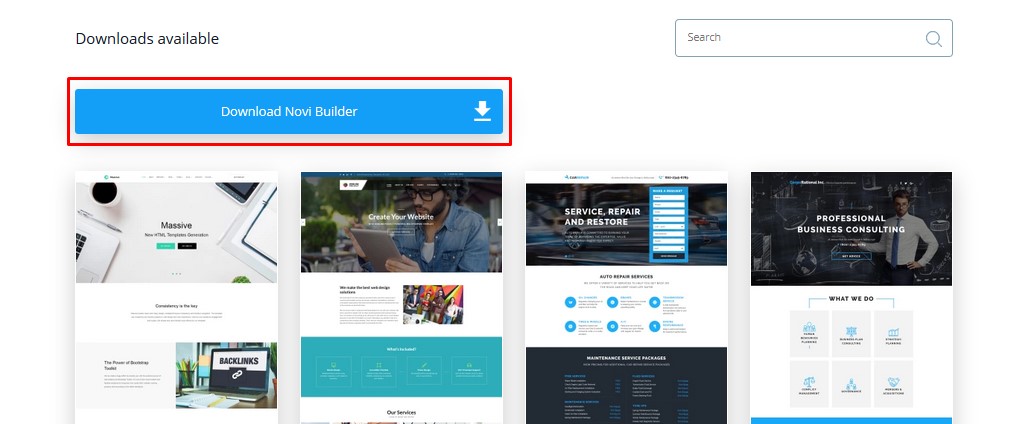
Do not hesitate to join our support chat at novibuilder.com if you are facing any problems with the downloading. Especially, if there are any troubles with signing into your account or during the installation.
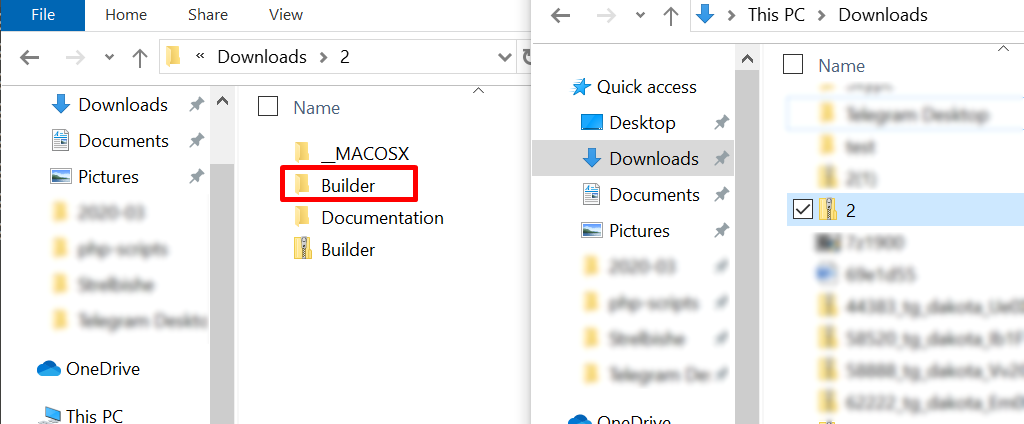
Step 2: Unzip the Package
Find the builder package at “Downloads” and extract it (or unzip). You are going to see the “Builder” folder inside. Create a zip archive of this folder.
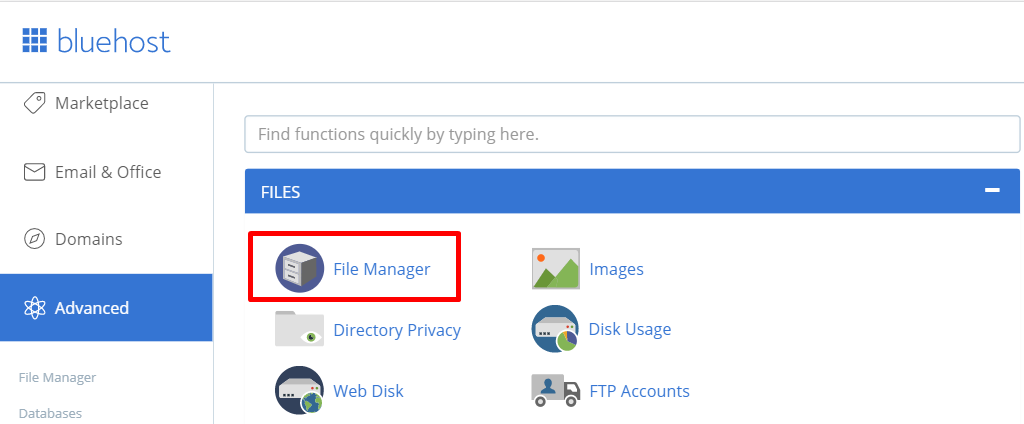
Then, sign into your hosting account and find the file manager:
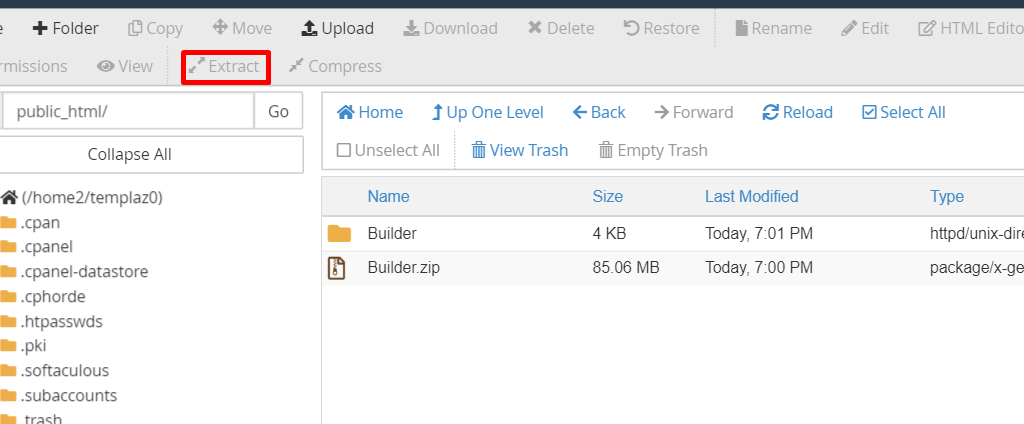
Step 3: Upload the Archive to Your Server and unzip
Upload the Builder.zip archive and unzip it on the server in the root directory (usually it is public_html or www) using control panel tools. Similarly, we can install the builder on the localhost. For instance, the common path for localhost WAMP is C:\wamp64\www. Path C:\xampp\htdocs for XAMPP, C:\MAMP\htdocs for MAMP.
Here’s how the final result should look like:
The control panel may vary depending on your hosting provider. On the other hand, some hostings do not provide any control panel.
In such a case, use FTP details to reach your server-side and upload the builder folder to the root directory.
Step 4: Open the Builder in Your Browser
Open the builder link in the browser. It looks as follows: https://your-website-URL/Builder
In our case we have the “Builder” folder, you can rename it to “builder” or “novi” and have a path like: https://your-website-URL/builder or https://your-website-URL/novi
Importing the HTML Template
With Developer and Advanced membership plans, you will get more than 35 HTML templates with a wide range of topics. Check all the templates on our website.
After importing a template, a ready-to-use website with prebuilt content will appear in the website builder.
In this section of our guide, we are going to install the template as a project with presets after installing the Novi Builder. These projects can be purchased and downloaded from the Novi Builder’s official website. You may also check the article Working with HTML Templates, and its Template Import part, if you want to import the HTML template.
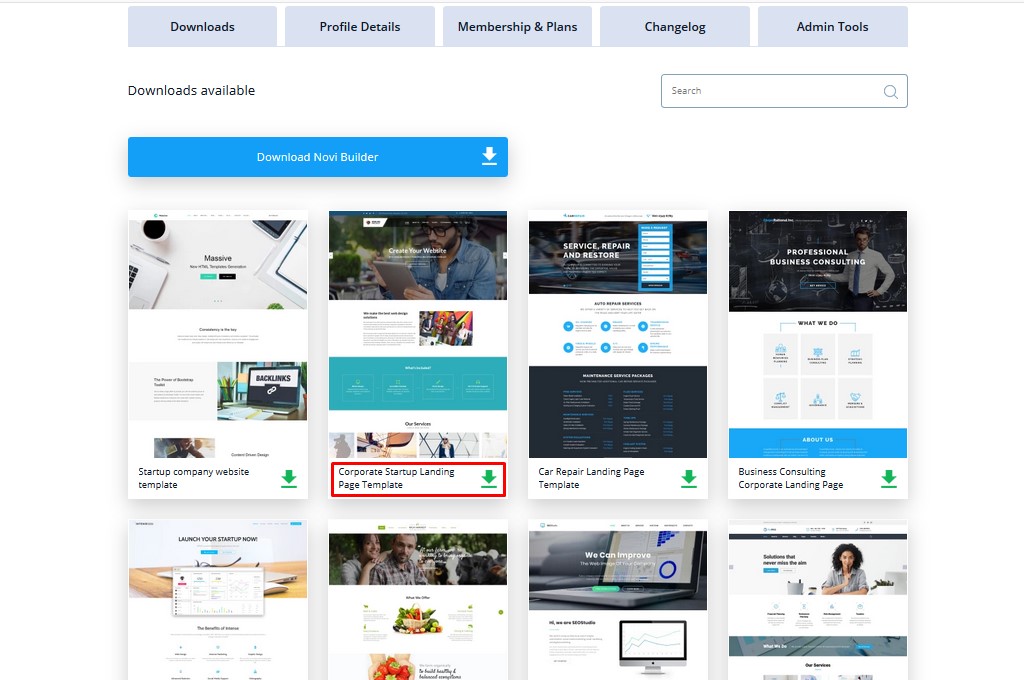
Step 1: Download the Template
Firstly, login into your novibuilder.com account and download the template. We are going to import the Corporate Startup Landing Page Template:
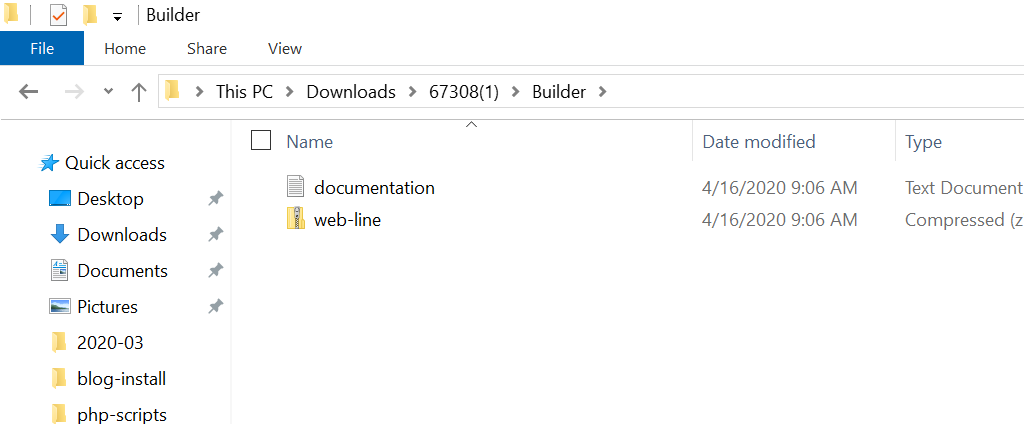
Step 2: Unzip the Template Package
Go ahead and unzip it on your computer. To do so, open the folder called “Builder”. There you will find a project. In our case it is web-line.zip:
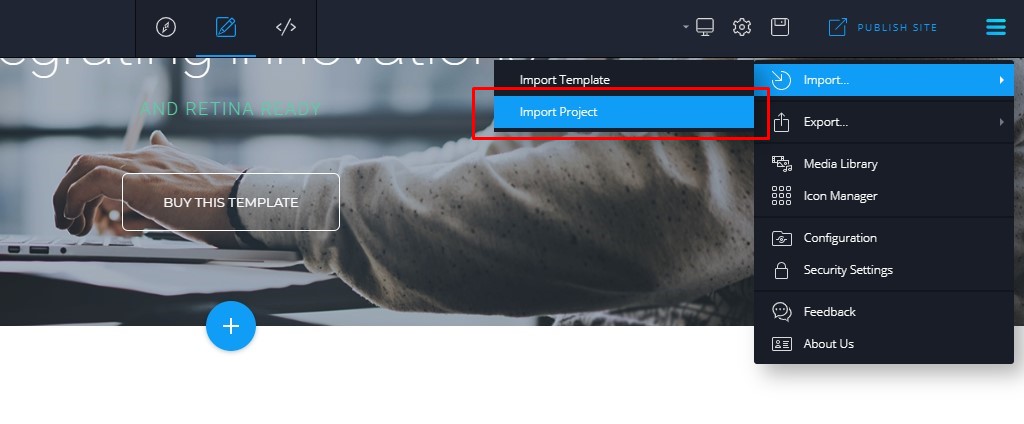
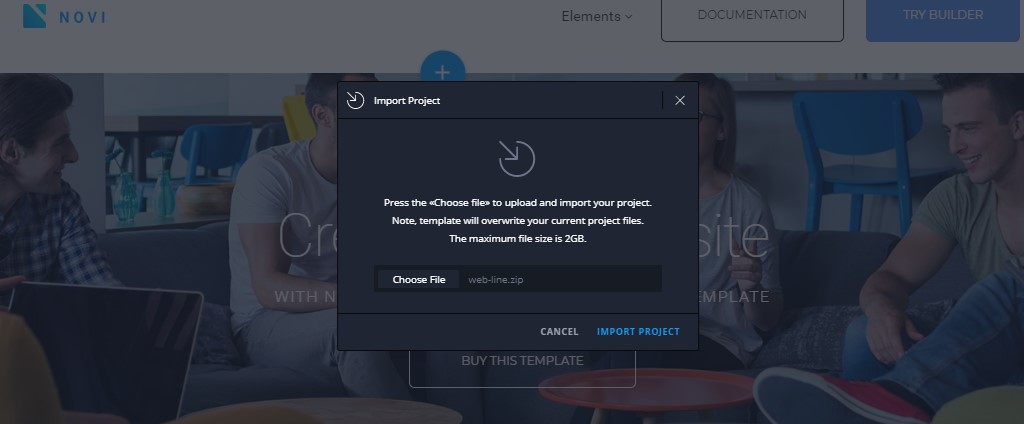
Step 3: Import as a Project
Open the Novi Builder. Go to the menu in the top right corner. Click Import – Import Project. Be sure to import the project, not the template:
Choose the template zip file and import. Wait until the import process is finished:
If you have any problems with importing feel free to purchase the installation service or extended support to get professional help.
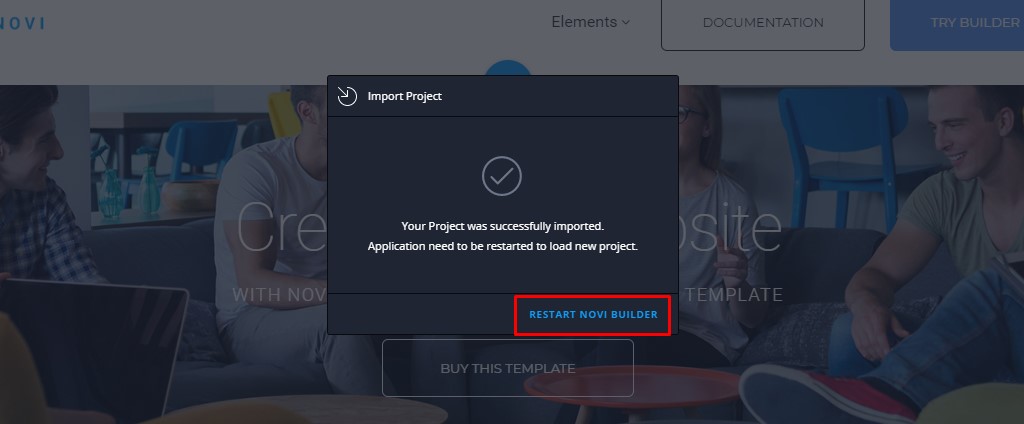
After that, to complete the import and view the result, click on “Restart Novi”. The Novi Builder will be reloaded.
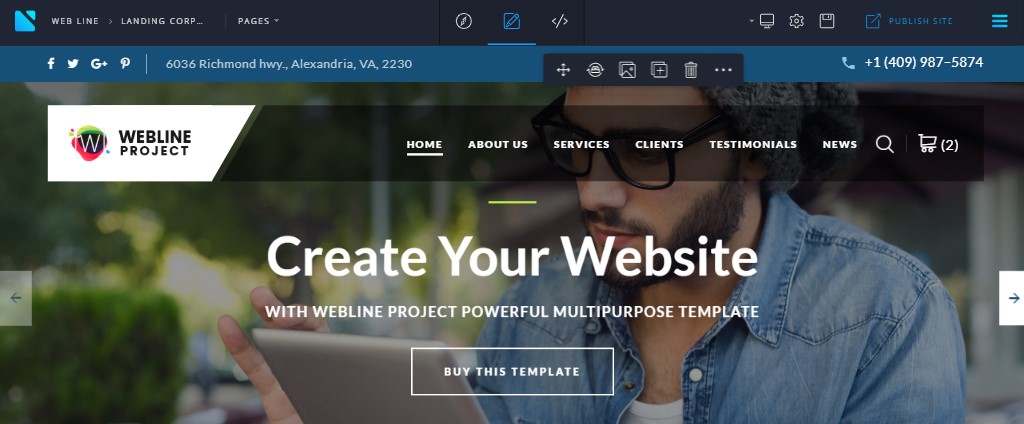
You’ll see the newly imported project. As a result, you will see a successfully imported template. Start working with it straight away:
Publishing the Project in the Root Folder
By default, the Novi builder publish path is defined as /projects/template/. In order to publish the changes in the site root, do the following:
In the main menu on the right side choose Settings option, then open the Publish tab. Rewrite the path ../projects/template/ to ../
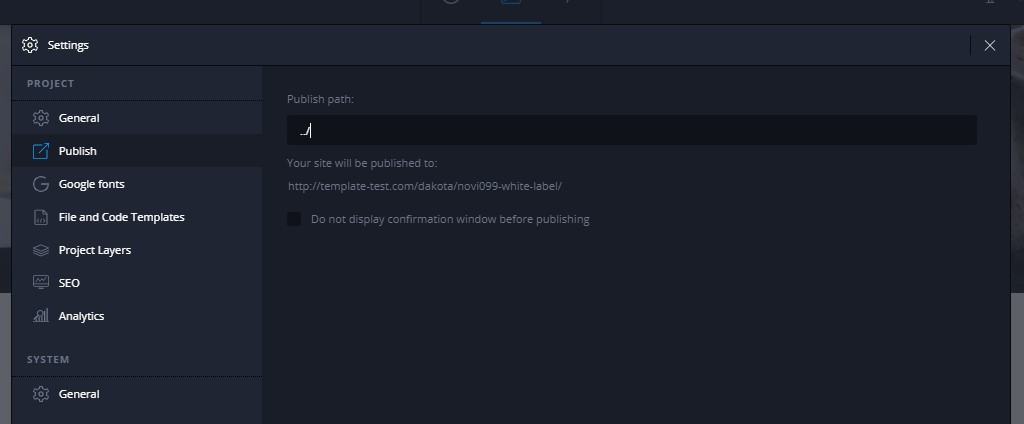
Finally, publish the project, open your site without /builder and check the changes. Your site will be published to the root directory.
If there are any problems, please check The Common Website Publishing Issues.
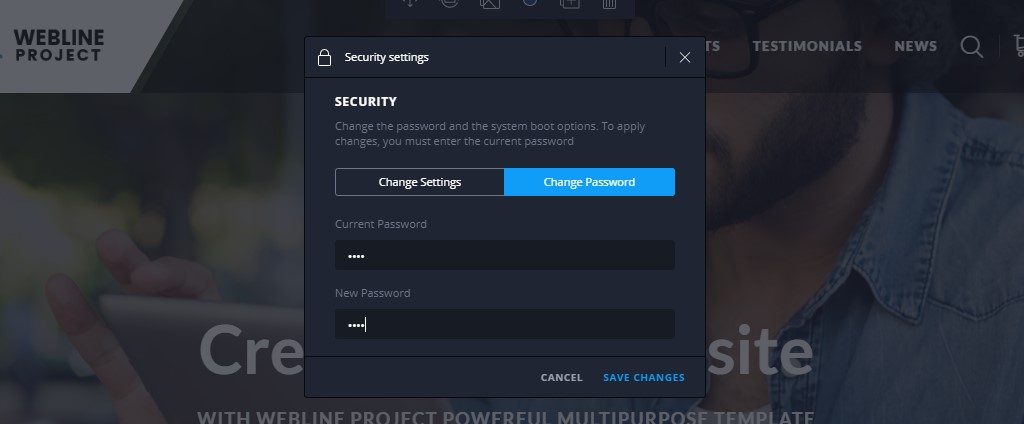
Changing the Password
Novi Builder includes a password check on system login. We strongly recommend that you change the default password after installing the Novi Builder and loading the application. To do so, open the Main Menu – Security Settings. The default password is “novi”.
Possible Issues and Solutions
Sometimes, errors occur during the installation or import. Such kinds of issues may show up due to specific configuration of your host or incorrect settings set by the user or hosting administrator. Let’s see some common errors and mistakes.
Issues Related to Builder’s Installation
Endless “Waking up” error.
If you have any errors when installing the Novi Builder, check the console. Most likely you will see the following error: Call to undefined function mb_convert_encoding() in …/builder/php/project-actions.php on line 248
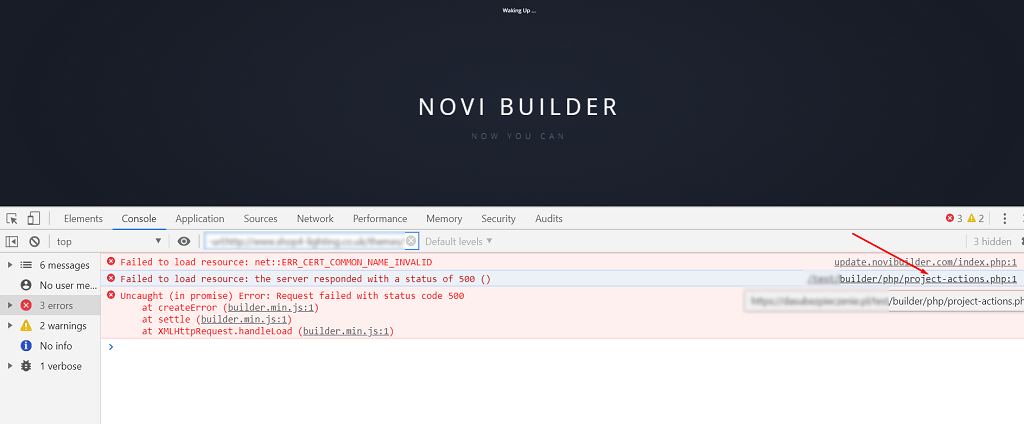
You can also check the Apache and PHP error logs on the server in order to determine the nature of the issue.
To fix the issue, please Turn on mbstring extension for your server in the cPanel >> PHP options >> extensions:
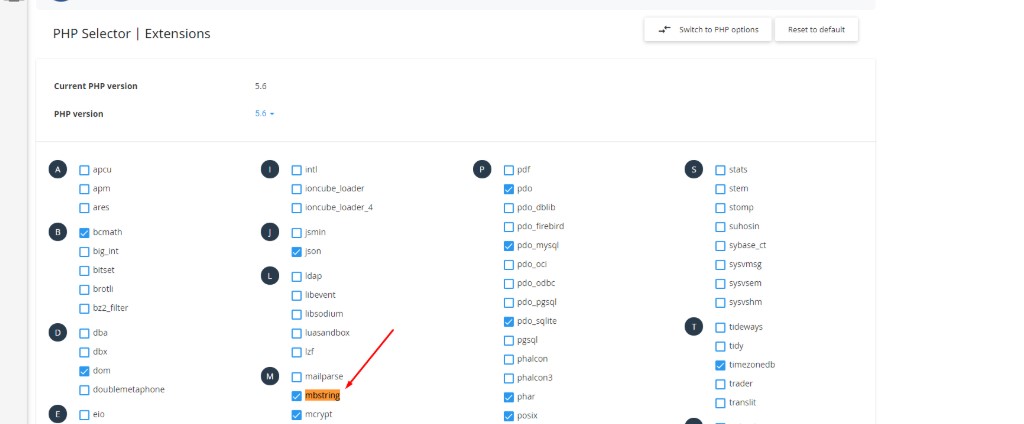
If the problem persists, please contact your hosting provider and ask to enable mbstring PHP extension. Also, make sure that the mod_security module is disabled on your host and fileinfo PHP extension is enabled on your host. It should solve the issue.
You can find more server-related errors and fixes in the previous article.
Issues Related to the Templates Import
Blank Page After the Template Import
Sometimes our users are getting a white page after importing the chosen template. The reason lies in a wrong import package. Please unzip the HTML template and find the correct import package inside the builder folder. See the part Importing the HTML template – Step 2: Unzip the template package of this guide.
Missing presets.
After importing the ready-made templates from Novi Builder’s collection you will get a chosen design on your site with presets.

We recommend you to reimport the HTML template as a project in case the presets are not available. You will need to import the file as a project, not as a template.
Installing the Novi Builder: Conclusion
We hope that you have managed to install the Novi Builder and import the template with this step-by-step guide. In this guide, we have briefly provided the main steps for Novi Builder’s installation and template import. In general, the installation is smooth and takes minutes. Please note that your server settings must meet the requirements in order to avoid possible issues we have outlined in this guide. Besides, we recommend ensuring that the ModSecurity module or other security modules are disabled on your server. Also, the mod_rewrite module and “file info” extension should be enabled before installing the Novi Builder.
If there are any difficulties with builder or template installation you can always purchase an installation service for $39 only. We will adjust server settings and ensure that everything works as expected. You may also get a professional Website Template Customization Service ($199) and get the website done within 4-7 business days.
Post a comment below if you know how to improve this guide or write the direct message to our support chat.


Leave a Reply