Getting Started
Overview
The brief overview of the Novi Builder plugin.
Welcome to Novi Builder!
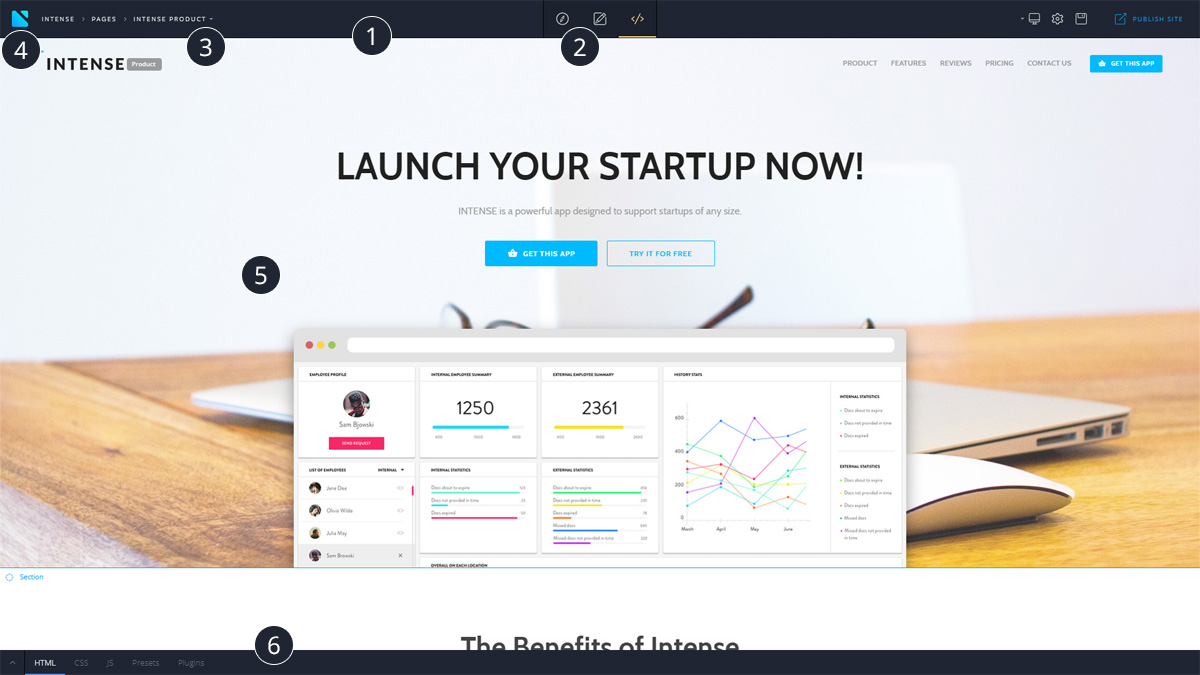
Novi interface:
- Main panel
- Novi modes switcher
- Page Manager
- Main menu
- Visual Editor area
- Developer's toolbar
Working with pages
- Page manager trigger
- Pages Search filter
- Adding a page
- Existing pages list

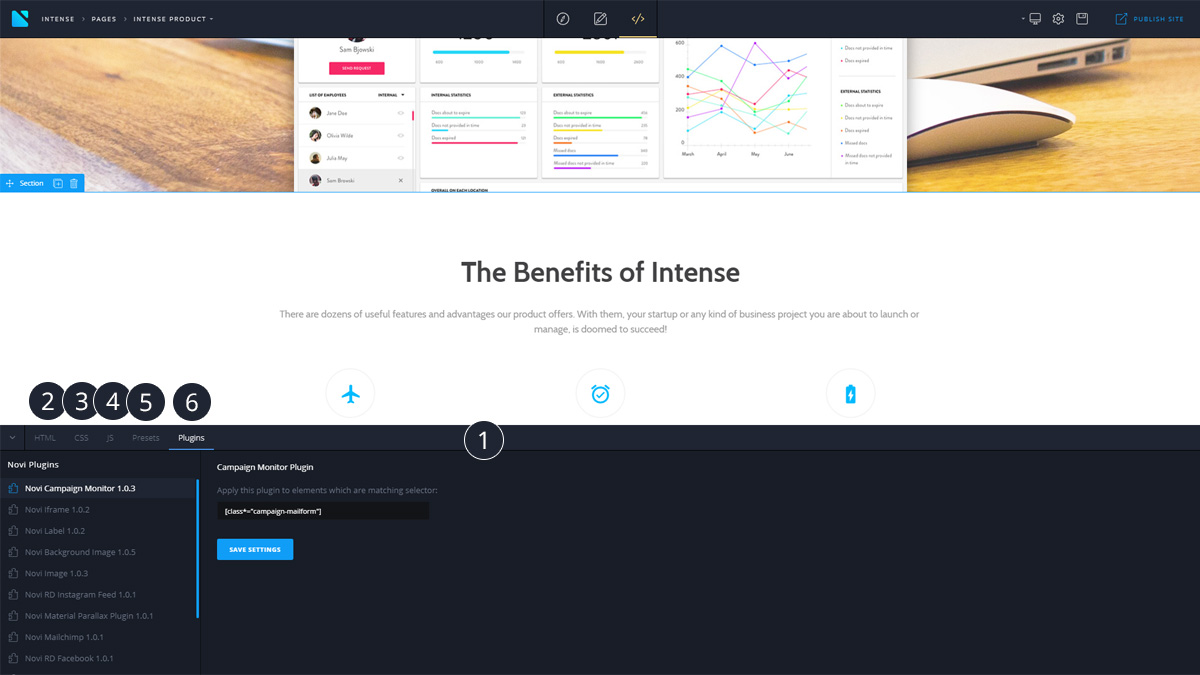
Developer's toolbar
- Developers tools area
- HTML code editor
- CSS code editor
- JS code editor
- Presets - presets manager
- Plugins - plugins manager
System Requirements
To ensure comfortable work with Novi Builder, your system should meet the following requirements:
- Browser: Chrome 50+ or Safari 10+
- 4GB RAM or more
- Display with minimal resolution of 1024 x 768
- CPU with minimal clock rate of 1GHz
- Keyboard and mouse
- The minimum speed of the Internet network connection - 1 Mbit.
Package Structure
After extracting Novi builder package you'll see the following files structure:
- documentation/
- demo/
- builder/
- config - builder configurations files folder
- plugins - builder external plugins folder
- ...Locally published website files
- builder/
Installation
Installing on a local server
You can install Novi Builder on a local server in a few simple steps:
- Download and install the software to launch your local server, e.g. WAMP, MAMP, or XAMP.
- Set up the local server according to the requirements of "Web server requirements" section.
- Extract the contents of the compressed Novi Builder archive into one of local server directories, e.g. your-disk/wamp/www/novi/.
- Launch Novi Builder using the link, which corresponds to the local server path, e.g. http://localhost/novi/
Installation on a remote server
To install Novi Builder on a remote server, you need to:
- Perform remote server installation according to the requirements described in "Web Server requirements" section.
- Download and install the software for work with FTP, e.g. Total Commander 7+, FileZilla etc.
- Upload the contents of the Novi Builder archive to your hosting server. Let us consider the example of Total Commander:
- Establish the connection with the server:
- Navigate to the tab Net->FTP connect... (Ctrl + F)
- Press the "New connection..." button
- Fill in the fields, specifying the data given you by your hosting provider:
- Session (the name of your connection, not granted by the provider, specify any suitable name)
- Host name[Port]:,
- User name:,
- Password
- Press "OK"
- Upload the necessary files to the server:
- Navigate to the tab Net->FTP connect... (Ctrl + F)
- Select the previously created connection name, "Session" field
- Press "Connect ..."
- Copy Novi Builder archive contents
- Navigate to the proper directory (root directory of your domain name by default).
- Paste Novi Builder archive contents.
- Establish the connection with the server:
Web Server Requirements
To ensure the correct work of Novi Builder, your server should meet the following requirements:
- Apache 2.2+
- PHP 5.4+
Apache Settings
- Turn off ModSecurity module or other security module
- Turn on mod_rewrite module
- Install php zip extension
- Install php mbstring extension
- Install php gd library
More information about server settings:
https://novibuilder.com/blog/how-to-fix-server-related-issues/
PHP Settings
- php_memory_limit = 64M
- upload_max_filesize = 64M
- post_max_size = 64M
- max_input_time = 60
- php_max_input_vars = 1000
- max_execution_time = 30
- short_open_tag = 1
- error_reporting = E_ALL ^ E_WARNING
Are you looking for reliable hosting provider that meets Novi Builder's hosting requirements?
Get a fast and secure hosting account with the following features:
- FREE Domain Name for 1st Year
- FREE SSL Certificate Included
- 24/7 Support

Authorization
Starting with version 0.9.0, Novi Builder supports password protection. To access the Novi interface, enter a default password - "novi".
We also added the following interface for configuring access to the builder. It looks as follows:
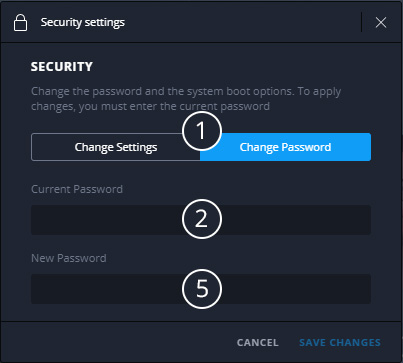
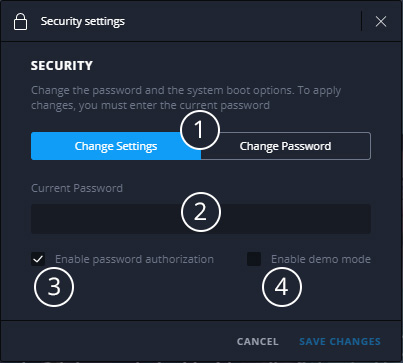
where:
- Safety settings switch
- Field for entering the current password, "novi" by default.
- Option for enabling/disabling the user authorization. All changes will be applied only in case of entering the current password correctly.
- Option for enabling/disabling the demo mode. All changes will be applied only in case of entering the current password correctly.
- Field for entering a new password. All changes will be applied only in case of entering the current password correctly.
How to disable login via password
To disable authorization, you need to complete next steps:
- Open the builder's main menu
- Select "Security Settings"
- Enter the current password
- Disable the option "Enable password authorization"
- Press "Save Changes"
How to change the password
To change the password, you need to do the following:
- Open the builder's main menu
- Select "Security Settings"
- Navigate to the tab "Change Password"
- Enter the current password
- Enter the new password
- Press "Save Changes"
How to reset password
To reset the password, you need to complete the following steps:
- Open builder/php/session.php
- in line
$currentPassword = "password";
Clear the value of variable $currentPassword:
$currentPassword = "";
* Please note!
* If the demo mode is on, a user doesn't need to authorize.
* If there is no password and authorization is enabled, the user will not need to pass it.
* We strongly recommend you to replace the default password "novi" with your own password.